Scratch Built AT-AT


[ This blog is arranged chronologically with the earliest work appearing at the start and the latest work appearing at the end ]

Encouraged by some, discouraged by most, I decided to create a record of the (extremely) long process of scratch building models. Having honed my skills on a life-size R2 I embarked on a large AT-AT for a number of reasons, not least because it had very few roundy bits that I can't yet recreate.

Started in 2007 the project went on hiatus for a couple of years but is now back on the work bench and going well. My plan is to complete the AT-AT by summer's end 2011 before kicking off on an x-wing.

Paper Mock Ups

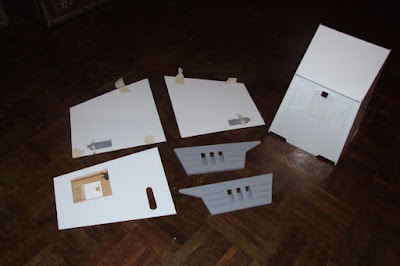
Showing uncharacteristic patience but heeding advice from those who know better, much of the head and body were mocked up in paper first. It did help but I think I prefer the trial and error of trusting to my plans and just ploughing ahead and making a piece. The 2 side armour pieces were the first I made and looks like they'll be some of the last pieces to be attached!

More pieces

The front box has been scribed and built, the back pieces are ready for assembly.

Body: First look

The full body taped together to give me an idea of size and to see if the overall shape is right.

Assembled body with first undercoat


Armour and some initial detailing attached, the body has now been sprayed a beautiful mat grey- I have always loved the look of pristine, undercoated but unpainted models, I'm not sure why!

Legs akimbo


With the body in good shape I turned my attention to the legs. Each leg will be constructed individually - I have not mastered casting and molding so it's all hand made. Hopefully for the x-wing build I will create master sections that I can then use to make molds - all my tests so far have failed, unfortunately.

Anatomy of a foot


These shots illustrate some good progress on the legs and feet and are also an insight into how the feet are built. I learned a lot about the various qualities of soup packaging in my attempts to find the right shape and size pieces for the feet. Turns out Tesco's Finest soups are, in fact, the finest.

Completed Leg & Foot


Some final (successfully cast!) pieces are added to the ankle to complete the first leg. Since starting this project I have moved house twice and acquired a dog - seen here steadfastly ignoring my hard work!

More Legs


More leg shots from various angles.

Standing at last!


With all 4 legs completed I can finally see if the whole thing will stand up - it's not pretty yet but it stands perfectly. The ipod in the first photo gives an idea of scale.


The body balances nicely on the internal support - adding the base and gluing everything in place should give it the rigidity it needs take the few knocks that will no doubt come along in the construction process - it hasn't fallen over yet but I'm presuming it will happen at some stage.

Securing the base


Making an arse for it


I had been worried about making this piece for a while as I knew it was going to be tricky but I actually really enjoyed doing it in the end. The difficult part was visualising the stages it needed to be built in. It was also the first chance I had to really go to town with all the greeblies I (and my long suffering but very understanding girlfriend!) have been collecting over the years - the detailing in this is not 100% movie accurate but it looks the part so I'm happy with it.

More greeblies...


A task I enjoyed less that I thought I would was the detailing of the under-carriage. I'm happy enough with it but I reckon I may go back to it at some point and add in more detail.

Where it's AT


This is the current state of the body & legs. I have more detailing to add to the body and feet and the completed 'drives' need to be attached.

Getting a Head


This is actually the third start on the head - the first seemed too large, the second too pointy but this one seems just right! I managed to keep the cockpit window from version 2 for this so it saved a little time.

Eyes


The 'eyes' are mirrors I bought a few years ago in a car parts shop. They are almost the perfect size & shape - I had to add a centimetre of plastic edging to give them depth but I'm pretty happy with them.

More head shots...


Head Detailing


More detailing added to the head. Being 100% movie accurate isn't as important to me as getting the 'feel' right. While building the R2D2 some of the episode 4 reference shots showed just how shoddy the real R2 costume was in 1977 - copying that precisely would have left him looking pretty dodgy in real life. That's my excuse, anyway!

Even more head detailing

A spending spree in Mark's Models & O'Sullivan Graphics has me armed with some excellent kits to bash and enough plastic card to see me through the AT-AT & hopefully the x-wing build. I have spent more time detailing the top of the head and the curving side pieces are now in place - they do need to be cleaned up a bit, though. The new kits should provide me with enough pieces for the side guns - the front guns will be trickier.

Side Guns


Working at this scale is a bit of a learning curve - I am not fully happy with the results but I will plough on and finish 1 gun, undercoat it, and see how it looks then. The reference photos for these guns aren't great so I am following the versions seen in the work of the mighty Jas Hodge who has produced a beautiful CG AT-AT in incredible detail - his deconstructed images have been of enormous benefit throughout this build.


Click 'Older Posts' below to see the latest updates - I know it makes no sense but that's just how it is..